


Google Assistant is a great feature for you to control your device through voice commands. You will be able to access the information from the calendars and also other personal details. Also, you can play the content on the Chromecast. Further, if you love music, you can also manage your music and access it through Google assistant. There is no official Google assistant available for windows but there is a way to access it on your windows. Therefore, by following some steps you can get Google Assistant on Windows 10. Find out the ways by which you can enable Google Assistant on Windows 10. You can know all the details about it here.
How to get Google Assistant on Windows 10?
To begin the process of using Google Assistant you have to install the Google Assistant unofficial desktop client on windows. Then you have to set it up.
- Firstly, go to the Google actions console. Then you have to choose a new project. After that, you have to agree to the terms and conditions.

- Enter the name of your project such as the Google Assistant and then choose Create project.

- Scroll to the next page and choose Click here. Then you will find the option Are you looking for device registration.

- Choose Register Model.

- Give the names you want in the product name and the Manufacturer’s name fields. Select any device in the Device type. After that choose Register Model.

- Choose option Download OAuth 2.0 credentials to get the JSON file. This will help you to set up the assistant.

- Now go to the Google Cloud Platform. Then press the option Select a Project which you can find at the top of the page.
- Choose the All tab and then select your project. After that press Open.
- Choose the option APIs and Services available in the left menu.

- Next, select the option Enable APIs and Services.
- Type Google Assistant in the search bar and then choose Google Assistant API.
- Choose the option Enable.

- On the next page, you will find option credentials. Then choose Configure Consent Screen.

- Choose the option External and then Create.

- Select User support email and then the email address.
- At the bottom of the page, you have to type in your email address. Then choose select Save and Continue.

- Choose the option Back to Dashboard.
- You have to scroll down to the Test users section and choose Add User.
- Enter the email address and choose to save.
- Now go to the Google Assistant Unofficial desktop client download page. Then select the option Google_Assistant-Setup-1.0.0-rc.2.exe to download it.

- Open the downloaded Google_Assistant-Setup-1.0.0-rc.2.exe file and then follow the steps. You have to select the option Anyone who uses this computer which will enable the assistant for people who use the computer. Also, there is an option Only for me (user) that will enable the assistant for your PC.

These are the steps you can follow to activate the Google Assistant on your PC.
What to do if Google Assistant does not appear immediately?
Sometimes the Google Assistant may not appear immediately after the activation. Here is the process you have to follow to make it appear.
- You have to click Windows key+Shift+A to make it appear.
- Then choose the option Get Started.
- Select the option proceed.
- Next select Settings gear.

- After the key file path, you have to choose Browse. Then go to the JSON file you downloaded.

- Choose Save and then select the option Automatically set a path.
- Select the option Relaunch Assistant.

- You will find a new browser and it will have the required security token. Go to your Google account and then press Continue.
- Click Allow.
- Then click Allow again.
- Select the option copy icon to copy the token link.
- Then paste the link in the Google Assistant app and click Submit.
- Press Relaunch Assistant one more time.

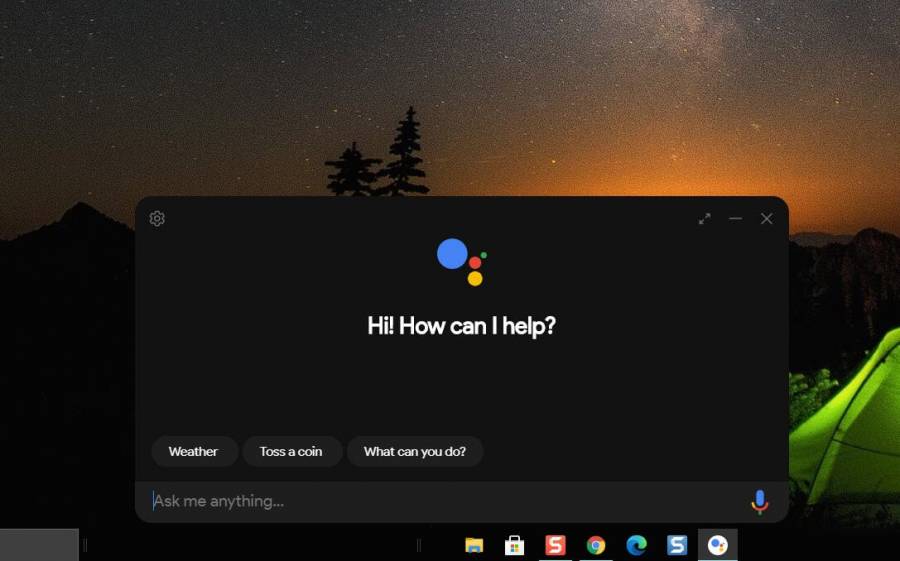
Now the unofficial Google Assistant will be ready for your use. You can type a question and select the microphone icon to receive a voice command.
Get the Google Assistant for Chromebook
- If you use a Chromebook or Chrome OS device you can activate the Google Assistant by following the steps given here.
- Firstly, go to the settings.
- Then find the Search and Assistant option and choose Google Assistant.
- Check if the slider is set to ON.
- Now activate the OK Google to permit the system to listen and respond to the voice commands.
Conclusion
These are the steps you have to follow to activate Google Assistant on Windows 10. You can make your work easy by using the voice command feature in Google Assistant.
Also Read: How to Download Windows Media Player 12 for Windows 10


